Quantcast
Channel: ArchiCAD 19 – Cadimage Blog
Viewing all 102 articles
Browse latest View live

Cadimage Schedule Notes Part 5: Notes Sets

$
0
0

This is an alternative way to work with the Schedule Notes.

5.1 Go to Cadimage>Doors and Windows>Edit Notes Sets

5.2 Add a note Set

5.3 Click Add notes to the Set

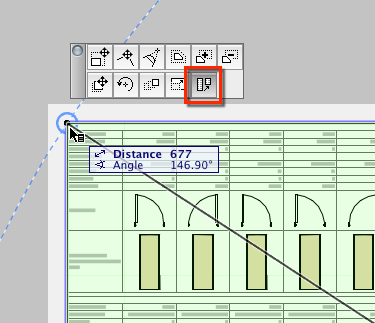
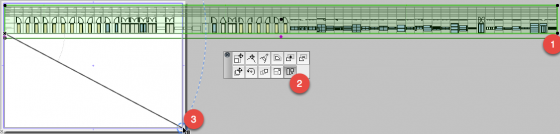
5.4 Select the Door or Window, notice that you can either select the door in plan or in the Cadimage Schedule

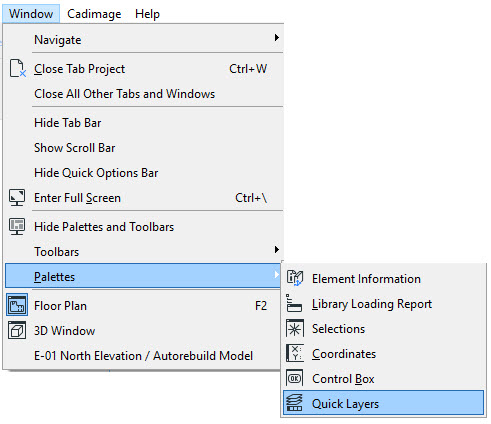
5.5 Go to Cadimage>Doors and windows>Schedule Notes Palette

5.6 You can add the notes Sets, whoever, notice in the video below that it’s important to click the Live box to apply the settings to the selection.

5.7 Now you have added the notes to the door or windows make sure to click the TO MODEL button if you decided to add the Set in the Schedule.

This step wouldn’t be necessary or available if you are adding them in Plan view.

You can also notice this can be done within the Door/Windows settings dialog box as well, but depending what you prefer to do, we recommend just to use the Schedule Notes Palette.

NOTES SETShDz6pP6DV0


Hide Doors and Windows in 3D

$
0
0

If you want to hide doors or windows in your 3D model bacause you may want to save the 3D model as an STL file for 3D printing or render a simple model, you can just turn their display off.

Go to View>Elements in 3D View> Filter and cut Elements in 3D> Elements to Show in 3D

Then uncheck the boxes

2016-05-24_11-30-19

Selecting your Cadimage Boundary Objects

$
0
0

The New Zealand template has a Criteria Set that makes it easy to select all your Site Boundary objects at once.

Go to Edit>Find and Select


2016-06-27_11-25-41

and select the option Cadimage Boundary +North and then ‘+’.

2016-06-27_11-25-05


This will select all Boundaries plus the North arrow visible in that Story.

Creating a Guide Line Segment in ARCHICAD 19

$
0
0

One of the ways to create a Guide Line Segment in Version 19 is by going to View>Guide Line options>’Create guide line Segment’

2016-06-27_12-04-28

Then Simply click, choose the type of line from the pet palette, drag it and click to complete the action.

2016-06-27_12-05-08

Shadow colours using Spotlight lamp

$
0
0

With the new Spotlight available in the General Light sources library parts that were released since ArchiCAD 18 you can play with the colour of the shadows projected if you change the spotlight colour

2016-06-28_9-51-22

The example below uses 3 spotlights with 3 different colours.

2016-06-28_9-50-49

Untitled - Picture # 1

Head Clearance Stair in 3D

$
0
0

If you are designing a new stair you may want to check if it complies with the minimum height clearance rules that apply in your country.

This is very easy and helpful with the Cadimage Stair tool, just go to

Settings>Symbol>Head Clearance and edit the minimum height.

2016-06-28_9-23-38


You can control the display of this clearance according to the Model View Options or by the Settings


2016-06-28_9-23-28

This is how it look in a section

2016-06-28_9-28-43

Column Covering – Footing

$
0
0

You can add a round or rectangular footing your column using the Cadimage Coverings Tool. The result will look similar to the image below (depending on your settings):

1. Go to your Plan View

2. Select your column

3. Go to Cadimage > Coverings > Column Coverings

4. Select the Cadimage Column Footing item:

cov-col-basic-04-06

For more information click link below

https://cadimage.zendesk.com/hc/en-us/articles/206272293-How-to-add-a-Footing-to-a-Column

How To Rotate An Object Using Objective


Restructure Schedule to Fit Layout

$
0
0
Note: This function is also available for Project Indexes placed on Layouts.
Use the Restructure Table command to automatically split large tables which exceed the Layout size into parts and lay them out next to each other.
The Restructure Table command is available in the Pet Palette, from the node of a selected Schedule placed as a Drawing.
2016-07-15_11-07-03
Click the command, then manually resize the Drawing frame. The following image shows a Window Schedule that does not fit onto an A4 sized sheet.
2016-07-15_11-09-16
The Restructure Table command is used to define a new enclosing rectangle for the Schedule table. In this case, ArchiCAD recalculates sizes and lays out the Schedule so it best fits the new geometry. The result: the Schedule is split in two portions which are placed under each other.
Note: If the selected Drawing is set to Split Drawing into Multiple Layouts, then the Restructure Table command will enable you to define a new enclosing rectangle, but instead of placing the Schedule parts onto a single Layout, each new part will be placed onto an additional Layout.
2016-07-15_11-12-58

Edit Rail posts

$
0
0

If you are using the Cadimage Timber Railing tool, you can easily edit the position of the balusters if you click the Edit Component button


2016-07-19_12-32-49


7OqzysYGds

Save Selection as Module

$
0
0

You can save selections as a hotlinked module or just as a module.

Just make a selection and go to File>External Content>Save Selection as Module


RMBjfAzIVr


This way you can easily create those hotlinked modules for multi story projects or to be used for details.


Slab Edge Footing Shapes

$
0
0

The Cadimage Slab Edge Footing has 4 different footing shapes that you can choose from.
On the footing page click on the large button to select the different shapes.

Quick Layers

$
0
0

If you want to quickly change the state of a Layer in your project without having to open the Layer Settings Dialog box  you can use the  Quick Layers palette. Go to Window > Palettes > Quick Layers to activate the palette

2016-08-08_20-57-17

YzJVPSKud6

Using this Quick Layers Palette you can Show/Hide Layers, Lock/Unlock Layers, Hide Selection’s Layer, Lock Selection’s Layers, Unlock Selection’s Layers, Hide Others’ Layers, Lock Others’ Layers, Undo Quick Layer Actions command , Redo Quick Layer Actions command.

Keynote Label Frame

$
0
0

If you are using the Keynotes Tool you have a variety of different frame styles you can use.


2016-08-10_8-06-03

Custom Angle 3D cutaway

$
0
0

You can use the 3D cutaway function to create a custom 3D cut plane in any direction

Just turn on the 3D cutaway symbol and click the arrow to the right to select the Custom Plane option.

Then hover the cursor to the element you want the cut plane to snap to.


FmneGW1NHx


Background Updating v Laptop

$
0
0

On the road with your laptop and want to get the most out of your battery while using ARCHICAD?

With background updating in AC 19 & 20 on a laptop you have a 3rd option “Enabled when device is plugged in”

Two ways to select this option.

  • If you look to the bottom right of your ArchiCAD Work Environment you will see a icon which shows the status…2016-08-23_14-53-20
  • Or create your own custom Work Environment with the option set to “Enabled when device is plugged in” under Model Rebuild Options.

2016-08-23_14-48-51

Label Doors and Windows ID in elevation or section

$
0
0

If you wish to label the ID or other properties of Doors and Windows in an elevation in ArchiCAD 19 there is a new method.

First of all make sure that the label placement method  is set to Associated, see article below

Associated vs Independent Labels (ARCHICAD 19)

Then go to the Label tool in the Toolbox and Select the ID label

Turn off the Arrow and change the anchor point to the centre

2016-02-22_12-43-41


Go to the Section/Elevation and select all the doors and windows you wish to label and go to the menu

Document>Document Extras>Label Selected Elements

2016-02-22_12-48-55

If you are in ARCHICAD 20

go to Document>Annotation>Label Selected Elements


2016-09-08_14-45-46


Where are the BIMx Export Options in ARCHICAD 20

$
0
0

In ARCHICAD 19 these options are available at

  • File > Save As (format: .bimx)
  • Organizer-Publisher / Navigator

In ARCHICAD 20 these options are available at

  • File > Publish BIMx Hyper-model
  • Organiser-Publisher / Navigator

in-ac-20

Notes:

  • In ARCHICAD 20 the File > Save as command cannot be used for exporting BIMx Hyper-models any more.
  • The Gallery options are only available after placing cameras in the project and adding their path to the Publisher Set.

Cadimage Door Handle position

$
0
0

Its easy to choose the Door Handle style from the pullout list, but the actual position of the Handle is not in the same tab, just go to Door Leaf > Left Dimensions or Door Leaf , click the Style button and select the Dimension

For ARCHICAD 20

Settings> Handles>Hardware> Exterior/Interior Handle> Handle Location

2016-10-18_17-01-12


For ArchiCAD 17 to 19

2016-10-18_16-58-53


Fascia Edge position

$
0
0

The Cadimage Roof Coverings tool now has the option to edit the position of the Fascia Edge in the settings


For ARCHICAD 20


2016-10-21_15-02-52


For ARCHICAD 19

2015-12-15_11-42-36

Viewing all 102 articles
Browse latest View live